This post is an update to one written in 2018 as the process and software used has changed since then.
Over the years I have had requests to share the details of how I do the technical things that power the FarmCam. Below are instructions for using EvoCam to share still images as well as timelapse videos on a website to which you have FTP access.
Unfortunately, EvoCam is no longer being developed so everything in this article will likely focus on Version 5.0 (64-bit preview 3) of the software. At the time of this writing one can still download the software from reputable sites; however, if you cannot find it, email me. I can provide the DMG file, but I do not provide support for the software! EvoCam works only on macOS, and I have tested it up to: macOS Sonoma Version 14.3.1 and current run it on my Apple Silicon (M3) iMac (2023).
There is an EvoCam User’s Guide, which can be accessed under the software’s Help menu. Please read it, especially if you have no experience with the software. I will not be covering connecting cameras, adjusting image sizes, exposure, etc. Again, I cannot act as support, which is why I am going into such detail in the article.

This article assumes the reader has a webcam that is either physically connected to the machine that will run EvoCam or a networked camera supported by the software. I use a networked ANNKE C500 – 5MP Outdoor PoE Security IP Camera which is mounted on a post on my front porch, and is wired using a PoE Injector.
File Transfer Protocol (FTP)
In order to upload your images and timelapse videos you need to enter your FTP credentials into EvoCam. This article assumes you know what FTP is, and how you connect to your web host using it.
- Click on EvoCam in the software’s menu and then select Preferences from the drop down.
- Click on FTP Server from the top menu, and then enter your FTP Server information. If the FTP fails at at any point during the resulting tests, you will need to check with your web host to get the correct setting. Sorry.
- Enter your username, password, and the initial path — if it is different than the root set in the FTP Server path. I use the temporary file setting, but it may not be necessary unless you are uploading images in rapid succession. If the FTP fails, and you know your path and credentials are correct, try checking this box.
Start with Still Images

In order to create a timelapse you need to take still images at different intervals. This could be every 60 seconds, every hour, once a day, or almost any other period. EvoCam will create the timelapse from these still images, and the length of your video will be determined by how many images are saved.
- Open EvoCam, and select New from the File menu. As soon as you open a new file, click on the File menu again, and choose Save As… Navigate to the directory of your choice, and give the project a name. When you start for the first time, EvoCam may actually find your camera and display the image. In my case, doing this step enabled my Mac’s built-in camera and I was staring at myself [that’s me in the screenshots in this article].

Click on the Actions button. For the sake of this tutorial we will be working exclusively in the Actions and will not discuss live streaming or recording video. During the time periods. If you are doing a 24-hour camera then you can leave the “During these time periods” as Always. Play around with the other options if you only want to perform tasks during a range of time or even based on detected levels of light. I recently switched to detected light levels so that my camera catches sunrise and sunsets and doesn’t abruptly stop. When any of these conditions occur. In the next section you decide when this action occurs. For this tutorial we will first need to create a collection of still images so that the time lapse can be created. Select “Every x seconds/minutes/hours” in the top Periodic conditions section. Change the default to however many seconds you want between new images. Hold off on checking the box next to the entry for now. Perform these actions. In my case I use the actions in this process to both “Add image to timelapse archive” and “Upload named image to the server.” It doesn’t matter which order you create these two actions. Once you select them from the drop down menu, change the settings as follows:

For “Add image to timelapse archive” you can check the box and forget it, but I suggest clicking on Desktop and navigating to a directory of your choice, or a new one entirely. There is no need to change the file Name from “Timelapse”, but you can. For “Upload named image to server” you can again check the box and keep the default file name or type your own. Engage! If you are happy with the settings then you can check the box next to your conditions setting from Step 4 above, which will start the process of taking a picture, saving a local copy to use as a timelapse, and upload a still image to your web server.
Time to Timelapse
This is the trickiest part of the process because it isn’t intuitive. Choose Options from the EvoCam menu and then select Show Multiple Action Sets. This displays a new option at the top of your Actions screen named Set, and the default is now Actions 1.

- Rename the still image action from above. Click the bisected circle with the down caret, and choose Rename Selected Set and change the name to something like Still Image.
- Create new Set for Timelapse. Now choose the drop menu circle again and select Add New Set. When prompted type Timelapse and click OK.
The resulting screen change should look familiar as a new Action. The process will be similar to that of getting the still image, but I’ll spell it out below.
- During these time periods. Again, if you are doing a 24-hour camera then you can leave the During these time periods set to Always or change the time periods to something that works for your project. For this article, I am describing my process, and I have it set to Always.
- When any of these conditions occur. In the case of the Timelapse Action Set, this is where you instruct EvoCam on when to stitch all of the still images it has been collecting and to turn it into a movie. In my case, I have chosen the Everyday at specific time option from the conditions drop-down menu and set it to Every dat at 11:59:59 PM.

Perform these actions. For the Timelapse Set there is only one action to perform, Export timelapse archive as movie, but with some confusing settings. After choosing Export timelapse archive as movie, check the box to enable the action, and then:
- Select all images, removing them from archive from the Export drop-down menu. NOTE: It is likely that I could save myself some headaches by changing this setting, but honestly I haven’t bothered. I address archiving via a Shortcut process, and it is only necessary if you want to keep ALL of your time lapses which will take up disk space.
- For the Archive Folder click on the default folder and navigate to the location you chose in section 5, subsection 1 in the still image process above. Make sure the Archive name is the same as the one in the still image process as well.
- For the Movie folder, click on the default folder, and navigate to the location of your choice. For the Movie name, type a name (without space, ideally).
Advanced Actions.
- Upload movie to server. Check the box next to Upload movie to server. This will upload your timelapse as an MP4 to the same directory you set in the FTP Server settings previously.
- Delete movie file after uploading. If you have no need for the original, local file, then you can choose Delete movie file after uploading. However, below I address archiving options (using Shortcuts and cron), so if you would like to eventually auto archive, leave the box UNchecked.
- Playback rate. The default setting is 30fps, which seems to be standard for online video. The problem is that the faster the frame rate the quicker your movie will go. You can play around with this setting find your sweet spot. You can also adjust how often a still image is taken if you want even more control over the look and feel of the final product.
Unless I have forgotten something, that’s really all there is to this whole thing. Read on if you want to learn about the basic code for your site so you can show off you work.
HTML For Your Site
There are a great many good sources for learning HTML, and I have to assume the reader has some basic HTML skills, and so I am only giving the most basic of mark-up in this section.
Still Image
In order to display the still image you uploaded to your website, use this code and replace YOURWEBSITE.COM with your own domain, and PATH with the initial directory set in EvoCam’s FTP Server preferences. If you changed the name of the image as well then make sure you use that JPG name.
<img src=”http://YOURWEBSITE.COM/PATH/mycam.jpg” />
Timelapse Movie
Again, this is the most basic of ways to display your video. Again be sure to change everything in ALL CAPS with your own information, and change MP4 name if you changed that.
<video src=”http://YOURWEBSITE.COM/PATH/timelapse.mp4″ type=”video/mp4″></video>
Shortcuts for Moving Files
For my process I need to move files around in order to upload them to YouTube and archive previous timelapses. The first process is to move the daily movie from where it is saved locally to my local Dropbox directory.
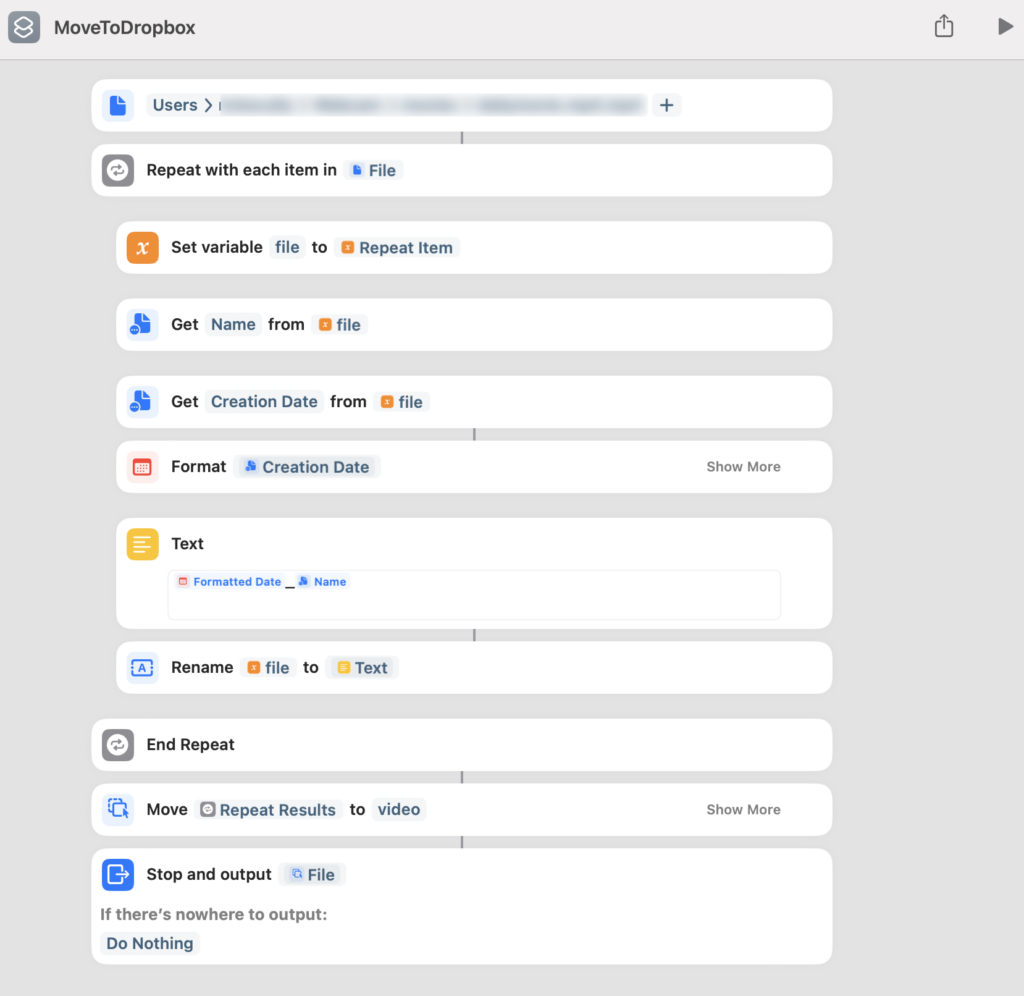
The Shortcut at right finds the daily movie .mp4 file (I have blurred out the path), gets the name and the creation date for the file, renames the file by appending the creation date to the beginning of the file’s name, and moves the file to a directory within the DropBox folder (named video in my case).
I use crontab to run the Shortcut at 5 mins after midnight each day. That looks something like this:
5 * * * * shortcuts run 'MoveToDropbox'Note that the Shortcut name in the image is the name found in the cron job.

Once the file is in the Dropbox folder a Zapier applet (they call them zaps) sniffs that folder for new content and then follows my instructions to upload the file to the linked YouTube account. This image at right is a snap shot of that applet.
Once the file has been upload to YouTube the next Shortcut can be run to move the file from the Dropbox directory to a local archive directory. This isn’t necessary but as I use a free Dropbox account with space limits this second process saves me storage space.
Using crontab again, the next Shortcut runs shortly after the last one, leaving enough time for the process to run. In my case the crontab looks something like this:
30 * * * * shortcuts run 'DropboxToArchive'
The Shortcut is a simple 2 line script that finds the contents of the Dropbox directory, and moves the file back to a local directory, in my case named “archive.”
That’s about all there is to it. The Zapier applet is a little complicated to share here, but if one needs to know the details, contact me.